I’m using two HaLowLink1 devices (Morse Micro-based). One is configured as an Access Point and the other as a WDS Client. The AP broadcasts the SSID “halowlink1-4b4b” with WPA2 encryption, and the region is set to “US”.
My goal is to connect both devices directly (point-to-point) without internet, just to test the wireless connection quality and range between them. I’d like to bridge the client’s Wi-Fi interface to its LAN port so I can connect a laptop and verify communication (e.g., via ping or iPerf).
The client device connects to the AP — I can see logs confirming association, and signal values appear in the UI. However, the Ethernet (LAN) port on the client device assigns an IP address from a different range than the AP (e.g., not in the 192.168.12.x range I set).
I tried enabling WDS and creating a bridge between the client’s HaLow interface and the LAN interface (eth0), but it didn’t work. The device still gives a local IP from another range, and I can’t communicate with the AP.
Here’s what I’m looking for:
Proper way to bridge the WDS HaLow client interface with eth0 (LAN).
How to configure both devices manually with static IPs to allow direct point-to-point communication.
Is the “failsafe BCF” warning critical for this type of setup?
Any working UCI or GUI configuration examples would help a lot.
Thanks in advance — I really appreciate any guidance. I just want to connect the two HaLowLink1 devices wirelessly and test the connection quality between them in a standalone setup (no router, no DHCP).
You should not be seeing the failsafe BCF warning. When this banner is shown the device will transmit with no power and you will see severely degraded performance, if you can establish a connection at all. Seeing this banner is a strong indication that some important configuration options have been modified and are not valid. I would strongly recommend performing a factory reset on both devices before continuing. See section 4 of the user guide which describes this process.
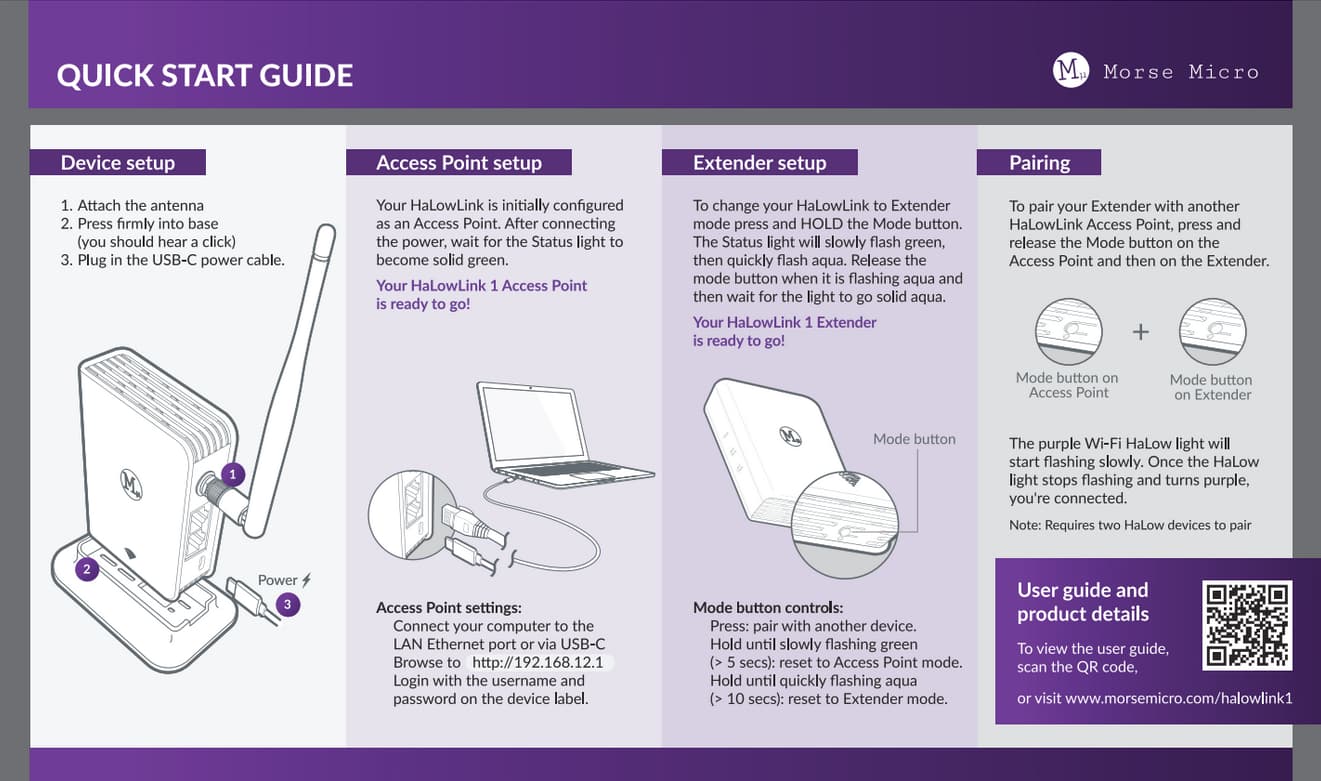
For the configuration you require, the standard mode, as described in the Quick Start Guide included in the box will get you closest to where you want to be. Following the quick start guide, you will have the HaLow AP bridged with the LAN ethernet port, on the AP device. On the extender device, your HaLow client interface will be bridged with both the LAN and WAN ethernet ports.
Attached for your reference.
If you absolutely must use a static IP address configuration in this network, make sure to change the extender first. After following the Quick Start Guide, it would have acquired a DHCP lease from the AP at connection time, so navigate to the AP Web UI (192.168.12.1) to find the address of the extender (192.168.12.x), then navigate to that address to access the Web UI of the extender. Use the Quick Config page to set the protocol of the lan network to Static and set your desired IP address.
Once the extender IP address is set, you can reconfigure the access point (192.168.12.1) in the Quick Config page to disable the DHCP server, and set a different IP address.